Door Repair: a few common problems and their solutions
/Entry doors are expensive and are often fitted to the exact door opening, making replacement more challenging. Especially when it comes to older and specialty doors, repair makes a lot of sense. We perform all types of door repairs. Here are a couple that we regularly encounter.
Door Anatomy Lesson
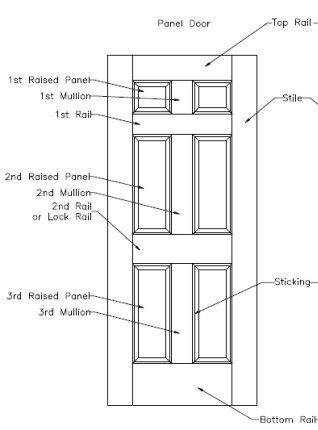
The anatomy of a traditional 6-panel door, source: https://brownstonecyclone.com/
An entry door is usually constructed with cope and stick joinery, meaning that the profiled portions of the door that resemble mouldings, are cut into the structural members of the door. When the mouldings are cut into the edges of the door, they’re known as sticking.
The structural members, the stiles (vertical parts) and rails (horizontal parts) are fitted to each other with a mortise and tenon joint. These joints are intended to be permanent and usually last for hundreds of years. In between the stiles and rails are floating panels, meaning that the panels are not glued in place, allowing the door to expand and contract without cracking the panels. The panels are generally a glue-up of alternating grained pine or similar. These panels are “raised” or cut with a tapering edge profile around their perimeter. This allows them to fit into a “dado” or groove around the inside perimeter of the door. This is commonly referred to as frame and panel construction and is one of the foundations of traditional woodwork.
Panel Damage
cracked panel (via pinterest)
We see two main types of damage on these types of doors—one caused by overzealous painting and another cause by forced entry. Sometimes a well-intentioned painter goes the extra mile and caulks the panel to the sticking so that there’s no gap. It looks great for a while, but it causes issues within 1-5 years. What this does is binds the panels to the sticking and can actually cause the panel to be pulled apart, ripped clean in two! This usually means cutting the caulk and scraping the entire panel with a card scraper then gluing and closing the joint back together and re-painting.
panel kicked in by firemen during a rescue operation
We also sometimes see firemen force their way in through a door panel since it’s the thinnest part of the door. This usually means complete replacement of the panel and one side of sticking. This is a fairly complicated repair. It requires gluing up a panel, raising the panel, milling new sticking, removing the remnants of the old sticking, gluing the new panel moulding in place, sanding, priming, painting, etc. That’s over a half day repair without paint. But, when the alternative is replacing the original entry door, it makes sense.
Jamb Issues
The door slab itself is only as good as its jamb. I see more issues with jambs that doors! Here are a few of the main ones:
The lock set doesn’t strike at the strike plate
Many of the neighborhoods we work in such as Park Hill, Mayfair, University Hills, and Cory-Merrill, were built in the 1920’s-1940’s. These homes often originally had mortise locks, a lock style that is essentially a metal box full of levers and springs that’s buried several inches inside the door. Modern locksets are barrel-style or cylindrical. When homeowners want to keep the original door but use a modern lock, it usually means filling the old mortise and re-boring.
Door is repaired and ready for sanding and paint
There are few finer points to a repair like this. First, it’s important to match the species of wood and moisture content ideally. I salvage old growth pine from old doors to use to fill these mortises because its density and moisture content will be nearly identical to the original. That means it will move with the door at the same rate throughout the seasons and will take paint beautifully and never flash through. I cut a long-grain block to fill the mortise, epoxy it in place and plane it flush when the epoxy cures.
For the face bores, this is where I see most guys mess up because they don’t pay attention to grain orientation. You have to cut a face-grain plug from the same species rather than jamming an end-grain dowel into the hole and cutting it off. End grain doesn’t take finish or glue in the same way as face grain and it’s also a pain to plane flush. By paying attention to grain orientation, you can make a perfect repair that will look factory fresh!
Joinery Failure
It’s rare, but sometimes the actual joinery of a door fails. This is usually due to a number of factors going wrong all at once. When this happens, if it’s a stock door that can be replaced with something off-the-shelf, it makes sense to scrap the old door and replace it. When it’s something unique though, we an repair it with some time and effort.
the crest rail and stile were pulling apart
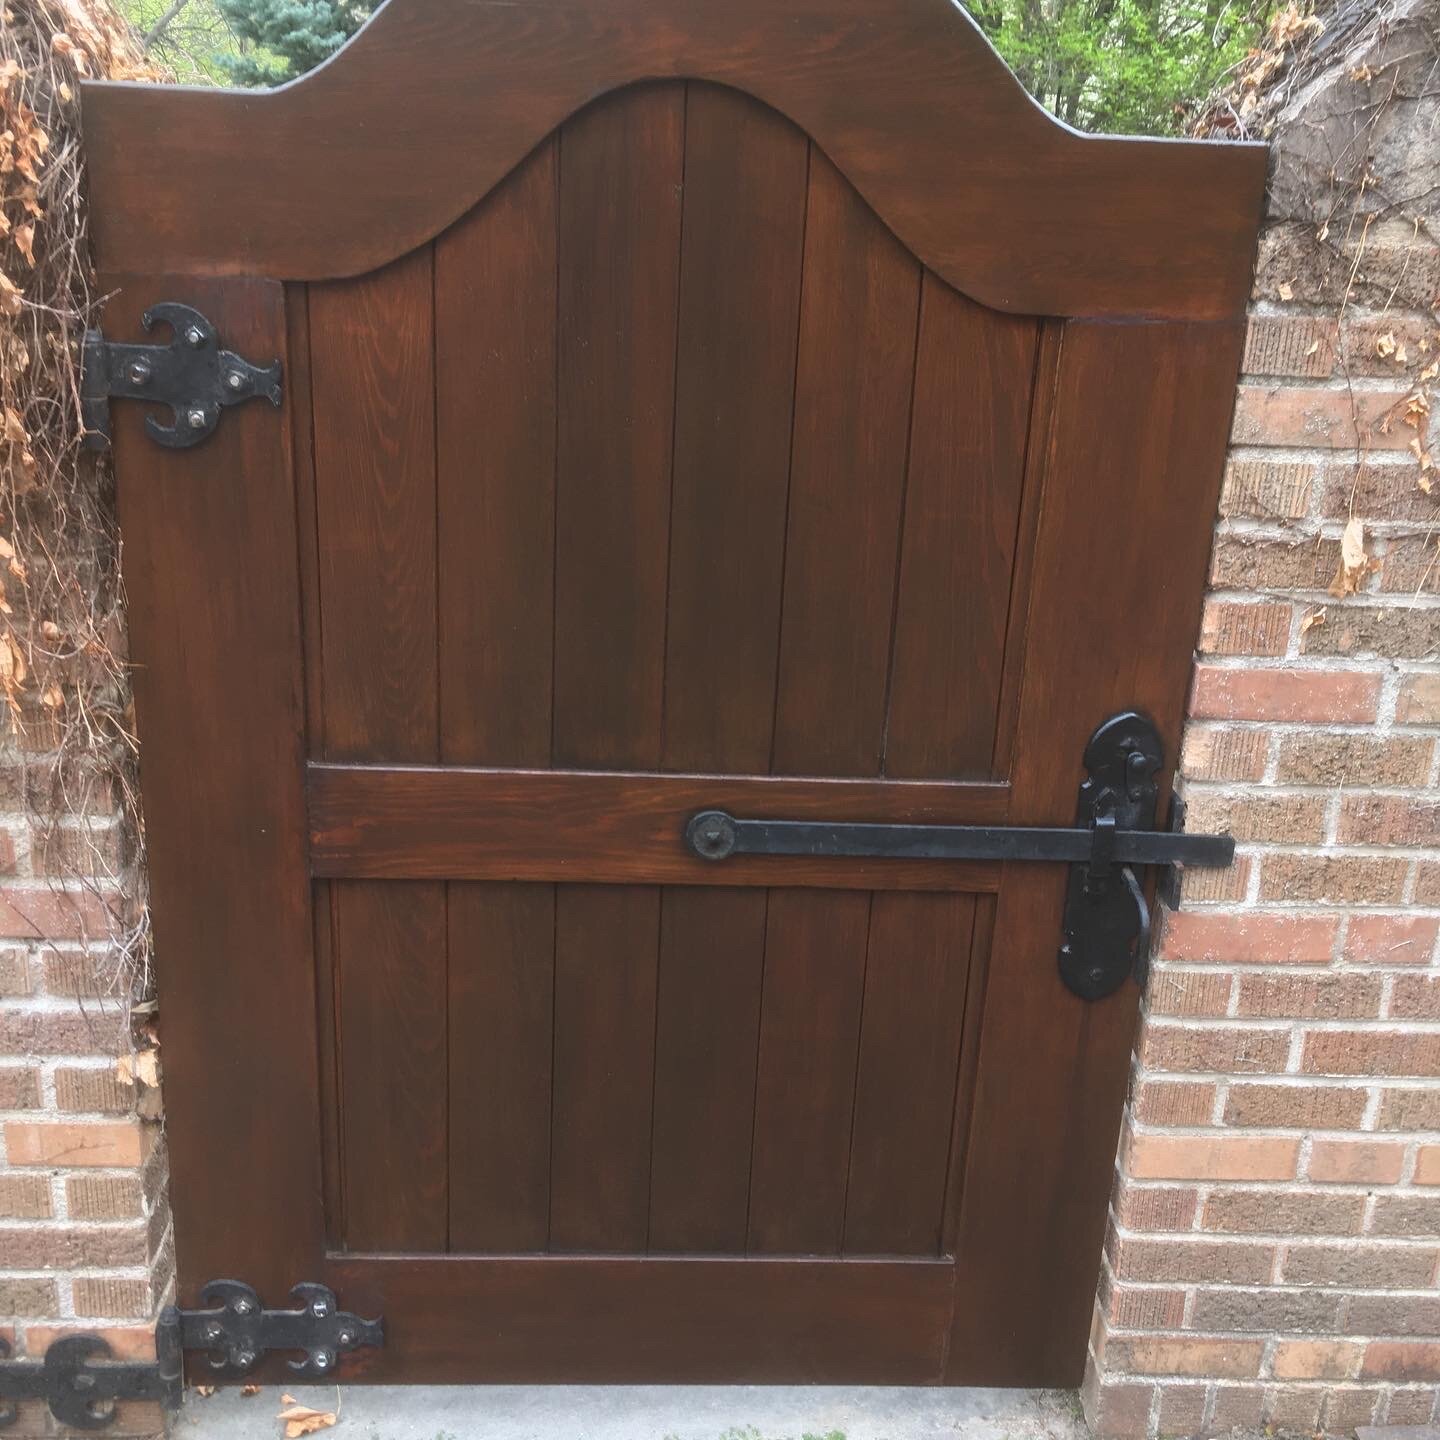
We fixed a gate this year that had failed completely due to improper joinery. The builder used dowels to join the stiles and rails, which is fine, but the dowels were under-sized, only 1/4” dowels for this 1-1/2” thick gate! They used standard wood glue which is not waterproof. They also oriented the grain of the wood in such as way as to allow the door’s natural expansion and contraction to force the joints apart by placing the crest rail on top of the stiles, rather than in between them. The final problem I found was they they hadn’t pre-finished the floating panels, so the portions that were dadoed into the door were exposed to the elements and when the panel shrunk during the winter, there was a light-colored border of unfinished wood exposed to the winter elements. It was a perfect storm, so to speak, for weather damage.
The repaired gate, ready for many more years of service
We disassembled the gate completely and sawed off the old dowels, replacing them with 1/2” dowels, 4 inches long. Everything was reassembled with a polyurethane adhesive which is weatherproof and super strong. Next, the floating panels were pre-finished around the perimeter to prevent further damage. While we couldn’t re-construct the crest rail, we added long timber-lock lags hidden under a tapered face-grain plug. The end result was a gap-free door ready for several more years of service.
Replacing an old lock with a newer style
This door had a mortise lock 4 hours earlier. We filled the old lockset and installed this new baldwin entry lock
This is one of the most common gripes with locksets in general. The plate where the lock wants to latch is either too high, too low, to far inside, or too far outside. Sometimes it’s as easy as adjusting the latch adjuster, a tab on the inside of the strike plate, with a flat bladed screwdriver. Other times, it means tightening a hinge screw into either the door or the jamb (the door is sagging), or moving the strike plate position. I use what’s called a “witness mark” to locate the strike, by blackening the latch with graphite and rubbing it against the jamb. The old position can be patched with a wooden block known as a “dutchman”, planed flat, then the strike can be re-mortised and bored.
Sometimes, the issue is weatherstripping. This is actually a good problem to have, since your weatherstripping needs to be compressed to do its job. Depending on the type of weatherstripping you have, it could require more than a gentle nudge to get the door to latch. This can mean fine-tuning the strike or swapping the weatherstripping for a thinner variant. We use top-quality silicone weatherstripping from Conservation Technologies on our projects, or traditional V-bronze.
“Are your doors in a jam and in need of some love? Are you unhung doors in need of a jamb? Are you sweeps binding, strikes missing, hinges creaking, stiles outdated? We’re your Denver door repair experts. ”


